
Advanced topics
Bulk publishing of pictures
If you have a thousand images to import, drag and drop publishing might be tedious. In that case you would better use
"bulk publishing".
MyPhotoDiary stores pictures into your home directory. For instance on Window and with an account named "John", the home directory is:
C:\Users\John\myphotodiary.
And the application data layout is the following:

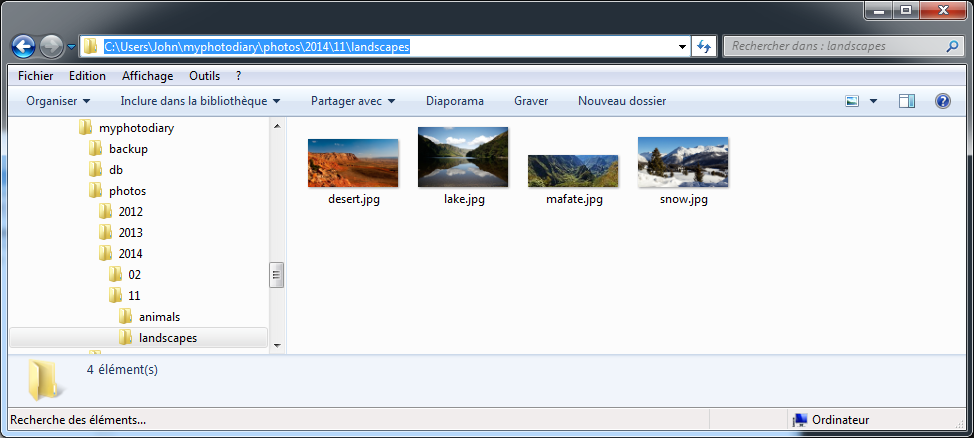
All the picture are stored in the directory C:\Users\John\myphotodiary\photos and its sub-folders.
If you have a large number of .jpg or .png pictures in your computer, you can use your file explorer to organize
them and store them into the photos folder.
Important: Use the schema enforced by myPhotoDiary:
- create a first level of folders per year and named with 4 digits (YYYY), for example: 2014
- create a second level of folders per month and named with 2 digits (MM), for example: 11 for November
- create a third level of folders per picture shooting sequence with a short name which makes sense for you,
for example: "landscapes".
And store the pictures in that directory:
C:/Users/John/myphotodiary/photos/YYYY/MM/<sequence name>/<picture>.jpg
You can now use myPhotoDiary application and click onto the root folder. It will automatically display the new folders. If you click on sub-folders with your images, it will display a waiting bar: do not worry, it automatically indexes and creates the images thumbnails. It also creates intermediate resolution images for an optimized transfer over the Internet. When it is done, it displays the new folder and the new pictures. The next time you will enter that folder, it will immediately display its content. If you now look at the file layout, you can notice the folders .thumbnails and .webimg. They are automatically created by the application.

Open Internet access
By default the application URL is http://localhost:9090/myphotodiary
With the commands ipconfig on Windows, or ifconfig on Linux and OSX you get the computer IP-adress:
four numbers separated by 3 dots, for example: 192.168.0.4.
Any other computer connected on the same local network can connect to the application with the URL: http://<IP-address>:9090:myphotodiary.
If the computer where myphotodiary is installed is connected through an ADSL box, it can be accessed from anybody connected to Internet provided
that you configure the ADSL box to map the port external-IP:9090 to internal-IP:9090
Please refer to your box documentation for the "port mapping"
configuration procedure. When the application can be accessed from the Internet, it is paticularlry important that every user has a non-trivial password.
You can also delete the anonymous account or give it a password to avoid anonymous access.
All these setings are possible through the users and roles administration panel.
Installation on a server
 Under work.
Build the software
My PhotoDiary is delivered as an Eclipse project and is built with maven. You also need to install a Subversion client to checkout the source code from sourceforge.
mkdircd svn checkout svn:// @svn.code.sf.net/p/myphotodiary/code/myphotodiary-code/trunk/components cd myphotodiary-webapp mvn -X -P embedded-hsqldb clean package
The maven build supports several profiles:
- embedded-hsqldb:
- the build output embeds an HSQLDB database. It can be directly deployed onto Tomcat. This is the profile which is currently tested.
- hsqldb:
- you need to install an HSQLDB server.
- mysqldb:
- you need to install a MySQL server.
- objectdb:
- you need to purcahse a license of objectdb